
It doesn’t matter whether it’s to the development, staging, or production environment, code is being pushed to Git 24/7. We always want to make sure that the code we invested so much time designing and writing will be readable, secured, and run smoothly without bugs.
Using automations saves time and reduces effort and cost while reducing manual errors allows you to focus on your primary objectives. Automating the process of quality testing your code and adding this process to your CI workflows ensures high-quality results even if there is a large number of tasks that need to be completed, as each task is performed identically and triggers automatically.
In this post, we’ll discuss the topic of code quality and explore what it means to write high quality code, why you should care, and how to improve it using CI tools.
What does it mean to enhance the quality of the code?
When discussing code quality we usually assume the code we’re reviewing has passed functionality tests and there are no critical or major defects, (i.e., the code works as expected). However, it may have hidden bugs or suffer from other low quality attributes.
Code quality is a measure of how well software is designed and written, and if it follows design constraints, best practices and coding conventions. It’s about writing code that can be easily read, maintained, and reused by others. Improving your code quality helps to ensure that your software can perform reliably and safely and that it’s easy to contribute to it. We already discussed in a previous blog post How to Improve C++ Code Quality. This post is not specific to C++ (but can be of course relevant for C++), it is more focused on CI pipeline techniques to improve your code quality.
The idea is to use CI workflows to check the quality of the code (security breaches, readability and coding conventions, and more). If the code does not meet your organization’s standards, you can trigger an alert or in some cases even prevent it from being pushed to a specific environment.
What is Github Actions?
GitHub Actions is a CI/CD platform that automates an application’s build, test, and deployment pipeline. GitHub Actions allows you to run an action or a set of actions when a specific event happens. For example, you can test your application code and if all tests were passed successfully build a container image and push it to a container registry.
GitHub provides ready-made Linux, Windows, and macOS virtual machines to run your workflows, but you can host your own self-hosted runners in your data center or cloud infrastructure if you need a tailor-made virtual machine with hardware that will fit exactly your needs.
We already used and discussed GitHub Actions in a few blog posts in the past:
- Extra CI flexibility with Github Runner on AWS Spot Instances
- GitHub Actions with a C++ Project
- Integrating GitHub Actions with Incredibuild
In this post we will use GitHub Actions to pursue better code quality.
How to improve your code quality
There are several ways to improve your code quality, but in this post, we’ll dive into three, and explain how to implement each one through our CI workflow. We’ll focus on the following aspects:
We already created a Git repository for each aspect and implemented it, you can rely on it if you are having trouble with setting things up in your environment.
Code coverage
Automated code testing enables you to change, refactor, and add features to existing code confidently, knowing that it will run properly.
Code coverage measures the percentage of code that was executed during testing. Code coverage is an extremely important metric because it lets you understand how much of the code base was actually tested.
You may think the tests you wrote are covering all relevant scenarios, but usually this is not the case. Testing each line of the code is very difficult – even if you have 100% coverage, this doesn’t logically cover all aspects and possibilities of the system, as the actual flows are based on combinations of different flows. Even so, reaching a high code coverage percentage is usually a good measurement of how thorough your tests are. By using a code coverage tool, you can spot untested areas more easily, make your teams more confident in their tests, and increase the quality of your code.
There are several code coverage tools available that can integrate with your existing CI pipeline. CodeCov is one of them and it also integrates nicely with GitHub Actions (with an app on the GitHub Actions marketplace). It generates a report that details what percentage of your code is covered by each test, which tests are failing, and which branches aren’t being tested.
In our Git repository, we have a calculator app written in Python and a tests directory that contains our app’s tests.
You can set up CodeCov in your GitHub Actions workflow easily by following these steps:
- Log in to CodeCov with your GitHub account from Here.
- Copy the CODECOV_TOKEN value that will be displayed and add it to your repository’s secrets.
- Add this code to your workflow:
jobs:
  codcov:
    runs-on: ubuntu-latest

    steps:
      - name: Checkout
        uses: actions/checkout@v2
        with:
          # Make sure the actual branch is checked out when running on pull requests
          ref: ${{ github.head_ref }}

      - name: Setup Python
        uses: actions/setup-python@master
        with:
          python-version: 3.7
      - name: Generate coverage report
        run: |
          pip install pytest
          pip install pytest-cov
          pytest --cov=./api
      - name: Check code coverage
        uses: codecov/codecov-action@v3
        with:
          token: ${{ secrets.CODECOV_TOKEN }}
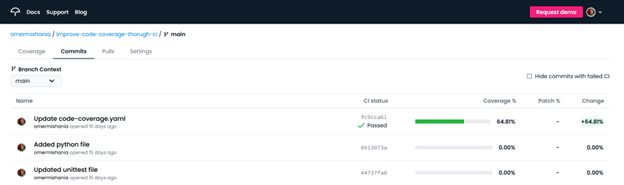
You can see the results here. For additional details, click on the repository name.
Here’s an example of our detailed results:
Now after you’re sure your code has reasonable test coverage, it’s time to talk about security.
Security Vulnerabilities
Code vulnerabilities are bugs and inappropriate or unapplied practices that can lead to a security breach and potential harm to the system’s users. Vulnerabilities can be anything from a minor bug like an off-by-one error to major bugs that allow attackers to execute arbitrary code and take over the server running the vulnerable application. It’s important to make sure that the code and data are secured enough to prevent malicious attackers from exploiting code loopholes and thus accessing sensitive data.
To deal with your application’s security, you need to find the vulnerabilities before a malicious attacker does it. There are numerous techniques for finding these vulnerabilities. Using static analysis security tools significantly increases the chance of revealing issues without even having to execute the code.
There are many tools you can use to secure your code, but SonarQube is the one that caught our eyes. SonarQube is an open-source tool for static code analysis. There is a dedicated Github Action app for it, which allows developers to run SonarQube in their Docker environments as part of their CI workflow. It detects security vulnerabilities among some other aspects, gives a rating to each repository for each aspect, and estimates how much time it’ll take you to solve that issue.
We used a simple Python app that returns the value of Bitcoin in different currencies. The app accesses an API that contains the value of Bitcoin using the `requests` Python module. In order to check the integrity of the tool, we added ‘verify=False’ to the HTTPS GET request to disable the certificate validation and simulate a security threat (see more about setting the verify flag to False in the `requests` documentation here). Setting the verify flag to False is a clear security threat as the SSL certificate would not be verified (the GET request will accept any TLS certificate presented by the server, and will ignore hostname mismatches and/or expired certificates). We want to see if SonarQube would be sharp enough to get on it.
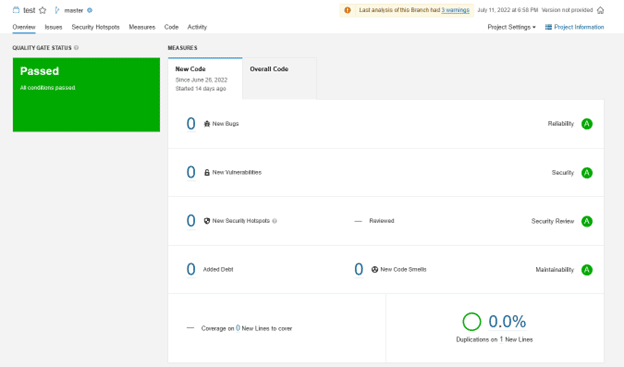
Here is an example of the results displayed in SonarQube on the original code:
And this is after adding the ‘verify=False’ to the HTTPS GET request:
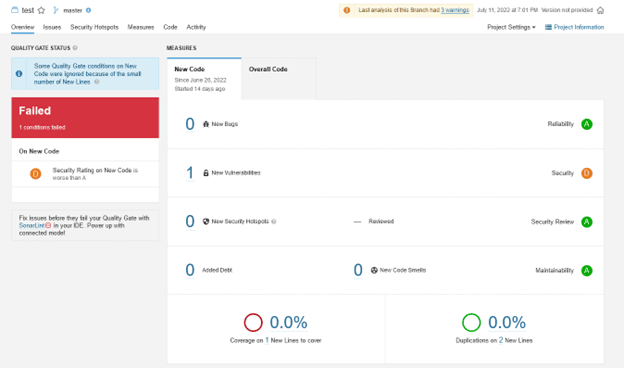
With the drill down on the newly found vulnerability:

As you can see, SonarQube is onto us.
How can you add SonarQube into your workflow?
What you need:
To run an analysis on your code, you first need to set up your project on SonarQube. Once it’s set up, you’ll get two variables – a SONAR_TOKEN and a SONAR_HOST_URL and their values, they’ll be useful later. Additionally, your SonarQube instance must be accessible from GitHub, and you will need an access token to run the analysis.
- Set up SonarQube in your environment.
- Create a new manual project, choose a name for it and select the GitHub Actions option and follow the displayed instructions in the on-screen tutorial.
- Create a `SONAR_TOKEN` by clicking this button:

- Copy the values of the `SONAR_TOKEN` and `SONAR_HOST_URL` variables Add both values to your repository’s secrets with the same variables names.
-
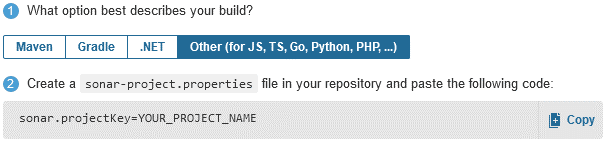
Choose the option that best describes your build and create a sonar-project.properties file in your repository and paste the code mentioned in the tutorial (from step 2) into the file. For example:

- Add the following code to your workflow:
jobs:
  sonarqube:
       runs-on: ubuntu-latest

       steps:
       - name: Checkout
       uses: actions/checkout@v2
       with:
      # Make sure the actual branch is checked out when running on pull requests
      ref: ${{ github.head_ref }}

       - name: SonarQube Scan
       uses: sonarsource/sonarqube-scan-action@master
       env:
      # The variables and values you added to the project's environment variables
      SONAR_TOKEN: ${{ secrets.SONAR_TOKEN }}
      SONAR_HOST_URL: ${{ secrets.SONAR_HOST_URL }}
Okay, so your tests are working properly and your code is secured, but what about the style?
Styling
Code styling is a set of human-readable conventions to make it easier to understand and work with a piece of code. A known example of a styling rule is tabs versus spaces or vice versa. It makes the code easier for us humans to read and understand when it fits a conventional standard.
We could just write out our code any way we want. Why is it important to use a format like this? Does anyone really care how our code looks as long as it works and we can figure out what it does?
The short answer is yes, they do. It’s not always easy to see what someone else’s code does right off the bat. One of the biggest issues developers face is trying to determine whether an existing piece of code will do what they need to be done. Code styling helps us eliminate some of the guesswork – if certain rules or conventions must be followed, we can agree on what those rules are and follow them consistently. That way, anyone who looks at our code quickly will get an idea of what it does.
We chose to improve our code styling using Prettier. It can be integrated with Github Actions workflow to automatically format your code whenever you make changes and commit them. Prettier will help you with the formatting of JavaScript, HTML, CSS, YAML, and MarkDown files, but there are community plugins available for more. It’s free and open-source, so anyone can look at how it works or change it if they don’t like the way it formats their code.
In our Git repository, we used simple frontend application files (HTML, JavaScript, and CSS). By using Prettier, the code was reformatted to fit a certain standard.
This tool edits your files directly and reformats them in your repository so there’s no dedicated platform for it. You can see the modifications that have been made to the code in my repository here.
You can style the code in your project CI workflow simply by using the Prettier GitHub action app. To put it into action there are two things you need to do:
- Make sure that the workflow has read and write permissions in your repository’s settings (under the ‘actions’ section).
- add this to your workflow:
jobs:
  prettier:
       runs-on: ubuntu-latest

       steps:
       - name: Checkout
       uses: actions/checkout@v2
       with:
      # Make sure the actual branch is checked out when running on pull requests
      ref: ${{ github.head_ref }}

       - name: Prettify code
       uses: creyD/[email protected]
And that’s it! After running this job, your code will be more readable and prettier.
Conclusion
CI workflows can assist you to write better quality code by preventing you from pushing bad code into your source repository. This prevents mistakes from being made and simplifies the development process. In this article, we covered three aspects to improve code quality but there are many more you can use, like detecting passwords and tokens that should be used as secrets or linting your code in order to find stylistic errors like unused variables, unreachable code, unnecessary code, using general exceptions, and more.
Workflows have their own challenges, they need to be developed and processes need to be put in place. Configuring the tools and setting up a decent workflow is no small task, but if you do it right you will notice the quality of your code improving in no time.
The question is: are you ready to enhance the quality of your code?