In our previous post, we learned how to set up the Incredibuild build system on AWS.
We saw how to speed up compilation using an EC2 helper machine as a small cluster of two machines – initiator and helper.
You can always add more machines if you need additional compute power, whether it’s AWS EC2s or local machines. But what if we need those computing resources for just a limited time? If we just use cloud EC2 instances then we can terminate them when not needed, but this requires manual handling or additional scripts to manage f(and those of course are not free, as they need to be written and maintained).
In this post, we’ll see how to use Incredibuild for cloud to utilize spot instances, achieving the flexibility and cheaper prices that come with it with minimal effort. This would allow us to increase cost-effectiveness and flexibility. Instead of managing EC2 machines, we dynamically use the number of cloud instances that we need for our build, without having to initiate and terminate machines manually (or to manage scripts to do that).
A spot instance is a spare AWS machine (like EC2, but not allocated as our “own” machine). Here is a brief description from AWS on that, feel free to skip if you are familiar with spot instances:
“A Spot Instance is an instance that uses spare EC2 capacity that is available for less than the On-Demand price. Because Spot Instances enable you to request unused EC2 instances at steep discounts, you can lower your Amazon EC2 costs significantly. The hourly price for a Spot Instance is called a Spot price. The Spot price of each instance type in each Availability Zone is set by Amazon EC2, and is adjusted gradually based on the long-term supply of and demand for Spot Instances. Your Spot Instance runs whenever capacity is available and the maximum price per hour for your request exceeds the Spot price.
Spot Instances are a cost-effective choice if you can be flexible about when your applications run and if your applications can be interrupted. For example, Spot Instances are well-suited for data analysis, batch jobs, background processing, and optional tasks. For more information, see Amazon EC2 Spot Instances.”
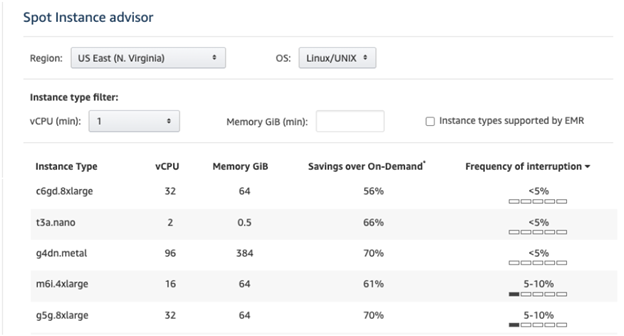
So, using spot instances for our build is an easy way to reduce cloud costs. But the discount is not free – there is a chance of interruption. The machine can be taken from us if AWS faces high demand for computing power (i.e. someone else is requesting to utilize these machines as a regular EC2). Each type of spot machine would have its own interruption rate, with higher interruption frequency resulting in lower prices per machine see “Frequency of Interruption” in the AWS Spot Instance Advisor UI below).
You can go to the AWS spot instance advisor to see this data live and compare machine interruption rates and price savings. Note that those change by time of day and region. Also keep in mind that by just moving to spot instances rather than on demand, you would be able to probably save as much as 40% on average or more on your cloud bill.
So how can we utilize spot instances for our build?
We already used Incredibuild installed on our network and saw how it accelerates our build by distributing processes to other machines on the network. In our previous post, we used an EC2 helper machine, and an initiator. We had an initiator that launched the compilation and used another EC2 as a helper machine.
The idea of distributing builds is to use helper machines that would speed up the process (which may include, in addition to the compilation, tasks such as static code analysis, testing, etc.) by parallelizing – taking pieces of those tasks and distributing them to helper machines.
We can set up local computers on our network as helpers and we can also use machines on the cloud using providers such as AWS, Azure, and Google Cloud.
In the previous blog post, we used allocated EC2 instances. In this post, we will move to AWS spot instances, but we would prefer not to handle all the hassle of managing the spot instances and to avoid the need to administer interruptions (i.e. spot instances that are taken from us during the build process). We can achieve this by using Incredibuild Cloud.
Let’s go for the spot!
The good news is that Incredibuild for cloud is going to take care of our spot instance management. We only have to configure the environment and let Incredibuild for cloud and AWS spot instances do the magic of dynamically allocating the required resources to complete the build. And when finished it’ll terminate all resources for us.
It also does something that the current AWS infrastructure does not support – it initiates fallback machines whenever spot instances are taken from us. Incredibuild will automatically initiate fallback machines (we will see how to choose them later in this blog). So eventually, Incredibuild for cloud makes sure our compilation task finishes successfully and produces the expected output even if a spot instance is interrupted.
We won’t delve into all the technical details of how the fallback mechanism works under the hood. But to understand the magic inside, one should note that moving to a new spot instance is not enough to achieve continuity. Incredibuild for cloud ensures that the new spot instance initiated is hot, with all the relevant artifacts, cache, and memory that were alive by capturing the state of the interrupted machine, cloning, and reproducing it to the new spot instance, thus allowing a smooth transition and handover.
This nullifies the requirement to EC2 instances as helpers (unless we have a pre-allocated EC2 machine that we need for other usages, and which is now idle, then we can drop such machines to the party as well).
Configuring Incredibuild Cloud
Incredibuild for cloud is a service that manages cloud machines for us. Following are the instructions required to set up your Incredibuild for cloud. Note that you may need the help of your AWS admin for some of the steps.
Step-by-Step
- On the initiator machine console run the following script to enable cloud:
/opt/incredibuild/management/enable_cloud.sh - If you are using an EC2 as your initiator, you would need to tunnel ports 8080 and 8081 to your EC2 machine localhost:
ssh -i <your_pem_key>.pem <username>@<ec2_public_ip> -L 8080:127.0.0.1:8080 -L 8081:127.0.0.1:8081 - We now need to access Incredibuild’s web GUI, which runs locally on your machine. Go to Incredibuild’s web GUI, accessed on your localhost:http://127.0.0.1:8080/incredibuild/
You should see the following in your browser:
- Click on the Coordinator Monitor tab, as marked in the above picture.
- Now press on the “Add Cloud Cores” button:
Make sure to allow pop-ups.
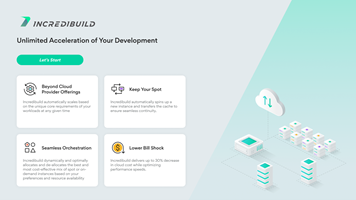
- Now we have to sign up for an Incredibuild for cloud free trial (unless already registered, or you have a license):
- We have to choose our cloud provider, which would be AWS in our demo:
- The free trial requires you to create a login with your email and click “Register”:
Connecting to our AWS account
To allow Incredibuild for cloud to manage spot instances on behalf of your AWS account, you must connect Incredibuild for cloud to a specific AWS role with the minimal privileges required for the process. Note that the build will run on your AWS account, so you will still need to pay for the AWS cloud instances that you utilize.
- The following step, creating an AWS role, would usually be performed by your IT admin. Follow these instructions to set up the proper Role ARN (“Amazon Resource Name”) and use any unique string as your external ID (you can choose any string as an external ID, this string would be used below to connect Incredibuild for cloud to your ARN role). After doing so we are ready to continue with Incredibuild for cloud GUI.
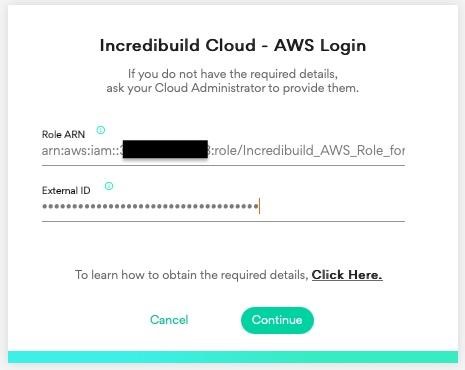
- Once you hit the “Register” button (on step 8), you will be prompted with the following form, where you would need to fill in the credentials you created in step 9.
Hit Continue and set up your cloud preferences:
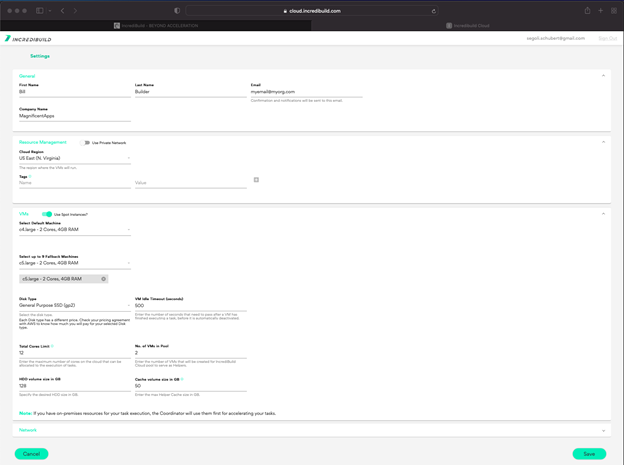
- Once you enter your credentials the next step would be to set up your pool of spot instance machines, this will be done in the following form, in which we’ll review in detail below.
- In the first section we are going to enter our name and the same email used to register our Incredibuild license.
- In the “Resource Management” section you probably want to choose the same “Cloud Region” you are using for AWS:
Selecting our Machines
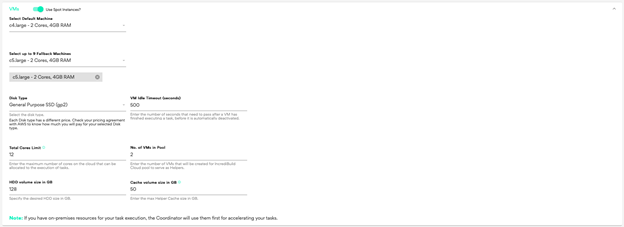
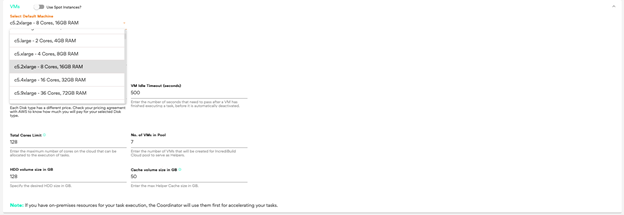
- We now need to choose the machines that we would like to use:
For this demo we will choose the smallest machines available: c4.large – 2 Cores, 4GB RAM. We can see that even though we use smallest (and thus cheapest) machines, we still achieve significant acceleration. However, for bigger projects you may want to consider c5 machines.
Also, make sure to select “Use Spot Instances?” as true:
as this would utilize spot instances as helper machines. To select the proper machine types, you may want to use AWS spot advisor mentioned earlier in this post. You may also want to compare the pricing of spot instances vs. on-demand.
Set the maximum number of cores of your new spot instance pool and the number of machines in your pool.
For more details see: https://docs.incredibuild.com/cloud/cloud_settings.htmlNote that AWS does not have a fallback mechanism but as discussed above, Incredibuild has developed one for us!
You can choose your fallback machines, as explained above, in this dialog:
It is interesting to note that the fallback mechanism, though more crucial for spot instances, is relevant also for on-demand machines. It will kick in also in case of a failure in an on-demand machine, primarily due to network issues (which are quite rare for cloud instances but can still happen). And, of course, in case you need more on-demand machines but there is not enough capacity in your pre-allocated cluster, Incredibuild for cloud would use spot instances to achieve the required capacity for your build.
- We are almost done! You can click “Save” at the bottom of the form
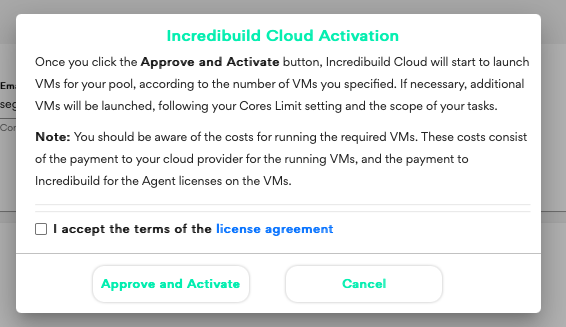
And accept the terms that would be prompted right after:
That’s it! We are ready to run our first build.
Running a Build
We have an environment and now is the time to run a distributed build.
In our case, the initiator resides on an EC2 allocated machine, and we also have four other idle EC2s that can be utilized for the build as helpers. The initiator would find our regular EC2s and the EC2 spot instances and use them all for the build. The spot instances are located by the initiator based on the instructions we performed above. The EC2s are found by the initiator as when we installed Incredibuild helpers there we allowed them to connect with our initiator.
So, we can now initiate the build with the following command from our console, in the initiator machine with Make:
Or with Ninja:
And voilà!
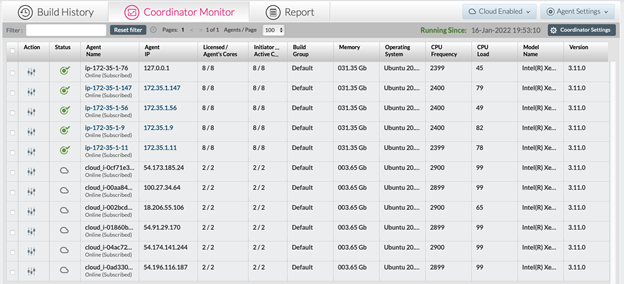
We can see that our build party consists of both spot instances together with our regular EC2s, getting to the total number of cores that we have requested.
The current build finished in our demo about 22% faster than without using the additional spot instances, and 77% faster than if running solely on our initiator. This result of course depends on the actual type of machines that are used, the cheapest spot instances in our case.
Needless to mention that if we would have used spot instances only, without any existing idle EC2s, there would be a need to allow more spot instances/larger machines to achieve the same significant build acceleration without pre-allocated helper machines.
To Conclude
We presented how to configure Incredibuild for cloud, together with AWS, and how to automatically achieve the power of spot instances for our build, without the need to manage initiation and termination and to take care of spot interrupts.
Incredibuild for cloud lets you utilize your cloud resource also if you are using Azure or GCP, in a very similar manner, preserving the transparency of the build distribution.
Using Incredibuild for cloud with spot instances is an amazing tool for accelerating your builds on-demand, with very little effort on your side and almost zero maintenance, bringing cost-effectiveness and development velocity to a whole new level.






 Set the maximum number of cores of your new spot instance pool and the number of machines in your pool.