
The Incredibuild build system includes several components which interact together to accelerate builds. In this post I will describe how to set up this system on AWS. This will be useful for anyone who wants to know more about both AWS and the Incredibuild system.
This is part one of two posts in which we focus on using on-demand AWS EC2 machines. In part two we will learn how to use spot instances to achieve automatic resource management and better cost effectiveness.
Prerequisites
To complete the steps listed in this post you’ll need to have an AWS account with full admin permissions as well as an Incredibuild license.
Minimal knowledge of Linux and the command line is assumed.
High-level architecture overview

- VPC: All the Incredibuild servers will be under a dedicated virtual private cloud (VPC)
- Incredibuild-coordinator: The only internet-exposed component which coordinates the workloads between the agent servers. We will use this server to initiate the builds and it will also act as an agent itself.
- Incredibuild-agents: Agent servers handle the build workloads. We will use an autoscaling group which allows us to dynamically allocate these servers depending on the requirements.
VPC and network components
We will start by creating the VPC which will host all the supporting network components. We will create the following network components:
- VPC – An isolated virtual network in a specified AWS region
- Subnet – A subnet in a specified availability zone within the VPC region
- Internet Gateway – Allows access to the public internet
- Route to the internet gateway – Handles routing from the subnet to the internet gateway
- Security Group – Defines ports and IP addresses which are allowed access to instances.
in the first step is to log in to your AWS account. In the top search box type “VPC” and click on the VPC service. On the top-right corner check that you selected the region you wish all the components to be created in.
In the left sidebar, click on “Your VPCs” then select “Create VPC” and input the following:
- Name: “Incredibuild”
- IPv4 CIDR block: “10.0.0.0/16”
- This allows you to allocate 65534 internal IP addresses for this VPC
- Click on “Create VPC”
Next, click on “Subnets” and select “Create subnet.” Now input the following:
- VPC: Choose the “Incredibuild” VPC
- Subnet name: “incredibuild-01”
- IPv4 CIDR block: “10.0.0.0/24”
- This allows to allocate 254 internal IP addresses for this subnet
- Click on “Create subnet”
Finally, click on “Internet Gateways” then click on “Create internet gateway” and input the following:
- Name: “incredibuild”
The internet gateway provides your instances with access to the external internet.
In the internet gateway page you created, click on “Actions” and select “Attach to VPC”. Then, select the “Incredibuild” VPC and click on “Attach internet gateway”
In the left sidebar, click on “Route Tables”. In the list of route tables look at the VPC column for the route table attached to the “Incredibuild” VPC. Right-click on it and select “edit routes”. Click on “Add route” and fill in the following for the new route:
- Destination: “0.0.0.0/0”
- Target: type “Internet Gateway” and select the “Incredibuild” internet gateway
- Click on “Save changes”
This lets you instruct all non-internal traffic to be routed to the external internet.
In the left sidebar, click on “Security Groups”, then select “Create security group” and input the following:
- Security group name: “Incredibuild”
- Scope: “VPC”, select the “Incredibuild” VPC
- Inbound Rules: click on “Add Rule” and input the following rules:
- Type: “All TCP”, Source: “My IP”
- Type: “SSH”, Source: “Custom”: “0.0.0.0/0”
- Click on “Create security group”
In the left sidebar, click on “Security Groups”, then right-click on the “Incredibuild” security group and select “Edit inbound rules”. Click on “Add Rule” and input the following:
- Type: “All TCP”
- Source: “custom”, and in the search box type “Incredibuild” and select the Incredibuild security group.
- Click on “Save rules”
This security group will allow access from your external IP address to any port on the instances and will also allow internal communication between instances which belong that security group (to allow communication between the coordinator and the agents). We also allow SSH access from any IP which is required to enable us to easily connect to the instance using AWS connect feature without requiring you to set up an SSH client and key.
Incredibuild coordinator instance
The coordinator instance is the main instance which distributes work to the agents. To make things simple, we will use this same server to initiate builds and as an agent.
In the AWS console’s top search bar type “EC2” and click on the EC2 service.
In the left sidebar, click on “Instances”, then select “Launch instances” and input the following:
- Instance type: “Ubuntu Server 20.04 LTS (HVM), SSD Volume Type 64-bit”
- Instance Type: “t2.medium”
- Network VPC: “Incredibuild”
- Subnet: “incredibuild-01”
- Auto-assign public IP: “Enable”
- Storage root size: increase to “20”
- Tag: “Name” = “incredibuild-coordinator”
- Assign existing security group: “Incredibuild”
- Launch (when prompted, choose to create a new key pair and save it securely)
In the left sidebar, click on “Instances” and wait for the instance state to be “Running”. Once it’s running, right-click on the incredibuild-coordinator instance and click on “Connect”, in the connect screen click again on the “Connect” button. A terminal window should open with a shell session on the server.
To install the Incredibuild coordinator you need to get a link to the Incredibuild installation binary from Incredibuild (check this link for a free trial version).
Once you have that link, enter the following command:
wget -Oincredibuild.ubin URLEnter the following command to install the coordinator:
sudo bash ./incredibuild.ubin install -i -C -S -A /etc/IncredibuildExplanation of the installation arguments:
- install -i – instructs to install Incredibuild components
- -C -S – install the coordinator, initiator and helper components
- This includes all the Incredibuild components which will allow us to initiate builds from this server and use this server as an agent for build tasks. It’s possible to also install each component on a dedicated server, see the Incredibuild documentation for more details about that.
- -A /etc/Incredibuild – Specifies the Incredibuild data directory
You can now close the terminal window and go back to the instances list, copy the public IP of the incredibuild-coordinator instance, and access the Incredibuild web-UIusing the following URL (replace COORDINATOR_IP with the public IP): http://COORDINATOR_IP:8080
- Note that in the security group we added a rule that allows your IP to access any port on this instance. This allows access to the 8080 port only for you. If your IP changed you should edit the security group and update it to your new IP.
To register your Incredibuild license, click on “Coordinator Monitor” and wait for the “Checking Status…” message to be replaced with the “Coordinator Settings” button. Click on that button, then click on the “License” tab and click on “Generate Key File”. Download the key file and send it to your Incredibuild representative to register. You should be provided with a license file which you should upload from the same place by clicking on “Choose File”, then on “Load File”
You should now be able to see your license registration details and you can start using the Incredibuild system.
Build a sample C++ project
The Incredibuild installation includes a sample C++ project which we can use to test the Incredibuild Coordinator and make sure everything works properly.
First, we need to reduce the minimal number of CPU cores which the Incredibuild system requires by default to accommodate for the smaller instance we used. In the Incredibuild web UI, click on “Agent Settings” and under “General” tab modify “minimum local cores for build” to “2”
Connect to the Incredibuild-coordinator instance (AWS EC2 -> instances -> connect) and run the following to install the required build dependencies:
sudo apt-get update && sudo apt-get install -y build-essentialThe build-essential package includes all required build tools to compile the sample C++ project.
To initiate the compilation using the Incredibuild system, run the following command:
cd /opt/incredibuild/samples/make_build
ib_console make -j 20- ib_console make -j 20 – this is where the Incredibuild magic happens. the “ib_console make” command is a wrapper around the standard make command which distributes make tasks to the Incredibuild agents. -j 20 instructs Make to run 20 parallel compilation processes which Incredibuild distributes to the agents. For real projects you should test for the ideal number of parallel processes depending on the available agents and the compilation tasks.
The compilation should complete quickly as it’s just a very small example project used to verify the installation.
Log in to the coordinator web-ui and click on “Build History” – you should see the build there named “Build 1”:
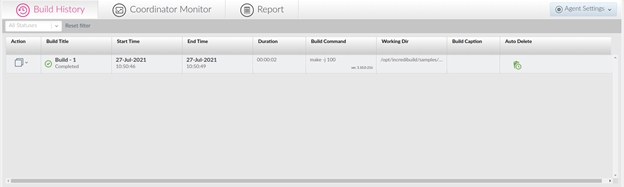
Click on the action button for that build -> open -> new tab. You can see the build details, click on the different tabs to see the available details.
Incredibuild agent instances
The agent instances handle workloads distributed to them from the coordinator. We will use an AWS autoscaling group to dynamically allocate agents as needed. This allows to scale down to 0 when not in use and easily scale up when needed to as many agents as needed.
First, we will create a single agent instance which we will then use to create an image that will be used as the template for the autoscaling group.
In AWS Console -> EC2 -> Instances -> click on “Launch Instances” and input the following:
- Instance type: “Ubuntu Server 20.04 LTS (HVM), SSD Volume Type 64-bit”
- Instance Type: “t2.medium”
- Network VPC: “Incredibuild”
- Subnet: “incredibuild-01”
- Auto-assign public IP: “Enable”
- Storage root size: increase to “20”
- Tag: “Name” = “incredibuild-agent”
- Assign existing security group: “Incredibuild”
- Launch (when prompted, choose the key pair you created for the coordinator)
Get the coordinator internal IP by clicking on the incredibuild-coordinator instance in the instances list.
Wait for the agent instance state to be “Running”, then connect to it and run the following:
Set the coordinator internal IP in an env var (replace “IP” with the actual internal ip of the coordinator):
COORDINATOR_INTERNAL_IP=IPTo install the Incredibuild coordinator you need to get a link to the Incredibuild installation binary from Incredibuild. Once you have that link, enter the following command (replace url with the download url)
wget -Oincredibuild.ubin URLEnter the following command to install the agent:
sudo bash ./incredibuild.ubin install -i -H -O $COORDINATOR_INTERNAL_IP -A /etc/IncredibuildExplanation of the installation arguments:
- install -i – instructs to install incredibuild components
- -H – install the Incredibuild helper component
- This is the relevant component for utilizing this instance as an agent for handling build tasks from the coordinator.
- -O $COORDINATOR_INTERNAL_IP – Connect the helper to this coordinator
- -A /etc/Incredibuild – Specifies the Incredibuild data directory
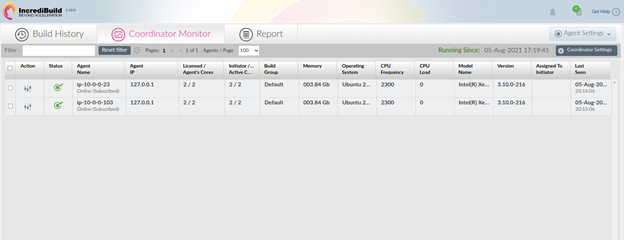
You should now be able to see this agent in the coordinator web UI -> Coordinator Monitor:
Now that the agent instance is ready, we can create an image and autoscaling group to dynamically create/terminate multiple agents as needed.
Stop the agent instance by right-clicking on the ‘incredibuild-agent’ instance and clicking on “Stop instance”. Once it’s stopped, right-click the instance again and click on “Image and templates” -> “Create Image” For “Image name” input ‘incredibuild-agent’ and click on “Create Image”
Wait for the image to be available at EC2 -> Images -> AMIs.
Once the image is available you can terminate the ‘incredibuild-agent’ instance by right-clicking on it in the instances list and clicking on “Terminate instance”.
EC2 -> Instances -> Launch Templates. Click on “Create launch template” and fill in the following details:
- Launch template name: “incredibuild-agent”
- AMI: Search for “incredibuild-agent” and choose the image you created
- Instance type: “t2.medium”
- Key pair: choose the existing key pair you created previously
- Network interfaces: Add network interface:
- Subnet: “incredibuild-01”
- Security Group: “Incredibuild”
- Auto-assign public IP: “enable”
- “Create launch template”
EC2 -> Instances -> Auto Scaling -> Auto Scaling Groups. Click on “Create an Auto Scaling group” and fill-in the following details:
- Name: “incredibuild-agents”
- Launch template: “incredibuild-agent”
- VPC: “Incredibuild”
- Subnets: “incredibuild-01”
- Group size:
- Desired: “3”
- Maximum: “3”
- Tags: “name” = “incredibuild-agent”
- “Create Autoscaling Group”
Now you can go to the instances list, and you should see 3 incredibuild-agent instances being created. Once they started you can log-in to incredibuild-coordinator web-UI and see them under “Coordinator Monitor” tab.
Build a large project using the agent instances
Now everything is ready to build a large project using the agent instance we created. We will build opencv which is a large C++ project.
For simplicity, we will use the coordinator server to initiate the build, but this could easily be done from a different dedicated server or from your CI system. Check out the Incredibuild Linux documentation for more details.
SSH to the coordinator server and run the following:
Install the build dependencies, required to build opencv:
sudo apt-get update &&\
sudo apt-get install -y python3-dev libiberty-dev cmake
Clone opencv GitHub repository and prepare to run the build:
cd ~
git clone https://github.com/opencv/opencv.git
cd opencv
mkdir build
Run the build:
cd ~/opencv/build
cmake ..
ib_console make -j 20- cmake is standard tool used to prepare for the build
- ib_console make -j 20 – runs make via the Incredibuild helper with 20 parallel processes which Incredibuild seamlessly distributes between the agents.
While it’s building, log in to the coordinator web-UI and check the CPU load in the agents under “Coordinator Monitor” tab. You can track build progress and tasks under “Build History” same as we did for the previous sample build we created.
Scaling up or down
When you are done with the build you can terminate the agent instances by editing the autoscaling group and setting desired size to “0”:
EC2 -> Auto Scaling -> Auto Scaling Groups -> click on the “Incredibuild agent” group -> click on “edit” button next to the group details title and set the following:
- Desired Capacity: “0”
- Minimum Capacity: “0”
- Click “Update”
You can now see the instances are being terminated in the EC2 Instances list. Once they are terminated you will also see them as disabled in the coordinator monitor.
When you need to use the agents again you can scale back up by editing the group details and setting the desired capacity and maximum capacity as needed.
Summary
In this post we saw how to set up a full production-ready dynamically allocated Incredibuild system which you can start using to boost your build performance. There are some improvements which could be done:
- Restrict internal network ports – to increase security of the internal networking between the components, you could define more restrictive security group rules.
- Use an SSH tunnel to access the coordinator – To encrypt and authenticate the access to the coordinator web-ui you could use an SSH tunnel.
- Use a dedicated server for the initiator component – For our example we had the initiator Incredibuild component installed on the coordinator server. This component allows to initiate a build and it could be installed on a separate dedicated server.
Another important missing piece for this puzzle is the integration with a CI system. In another post we show how the Incredibuild environment we just set up could be integrated with GitHub actions, allowing us to initiate builds from GitHub push events.
In this post we used on-demand AWS EC2 machines. This requires manual handling of the resources, which in many cases are being used only for a certain amount of time, thus the user shall handle their initiation and termination. In addition, there is a better cost-effective alternative for using on-demand machines on the cloud, which is Spot instances. In part two, we will see the advantage of using Spot instances with Incredibuild Cloud.