
The word Ninja invokes the imagery of stealth and speed in my mind. When developing a “yet another build system” – as the creator of Ninja, Evan Martin, referred to Ninja in its manual – speed was of paramount importance. Naming the build system Ninja is apt as I will show you its capabilities in this blog post and highlight this USP. Let us begin.
What is Ninja and why another build system?
Let us begin with why Ninja was invented. During the porting of Chromium from Windows to other operating systems, build performance was becoming a bottleneck. You can read all about it here. Using Makefiles was found to be suboptimal and a new build system conceptually very similar to Make but with a focus on speed was conceived. It reduced the build start-up time of Chrome to under one second and was open-sourced soon after. It achieved this feat by:
- Choosing speed over convenience as a design principle
- Having a minimal set of policies or built-in rules (to be taken care of by ninja input files)
- Builds are always being run in parallel, based by default on the number of CPUs your system has
Every build system eventually creates a graph of dependencies by parsing the build file. (In the next section, I have an image of this graph for Ninja itself). The build process traverses this graph to get the final output. In the case of Ninja, this is a two-phase traversal where:
- In the first phase, the graph is walked up from the final output to the input files to see if there are any modifications and creates a plan for the build
- In the second phase, the graph is walked down from the input files following the plan and executed in parallel
Further, the following low-level design decisions helped to make Ninja fast:
- Re2c is used for parsing the build files which is highly efficient
- Ninja canonicalizes the paths in the build file. Rather than treating the file paths as strings, it converts paths to a Node object, thereby eliminating costly string comparison for path equality checking. To compare if two paths are equal, Ninja just need to do pointer comparisons which are extremely fast
- A build’s configuration (such as compilation flags used) is kept in a binary serialized format by Ninja. To determine if the output is out of date due to a change in the build configuration, a binary hash comparison is all that is required.
All these low-level optimizations make Ninja fast and efficient.
Getting Ninja
On Windows, building Ninja from source is easy. Here are the steps:
- git clone https://github.com/ninja-build/ninja.git
- cd ninja && python configure.py –bootstrap
Install the latest version of Python and open a Visual Studio x64 native tools command prompt. Issue the above two commands, the first of which will download Ninja source from its GitHub repository and the second command will magically build Ninja.
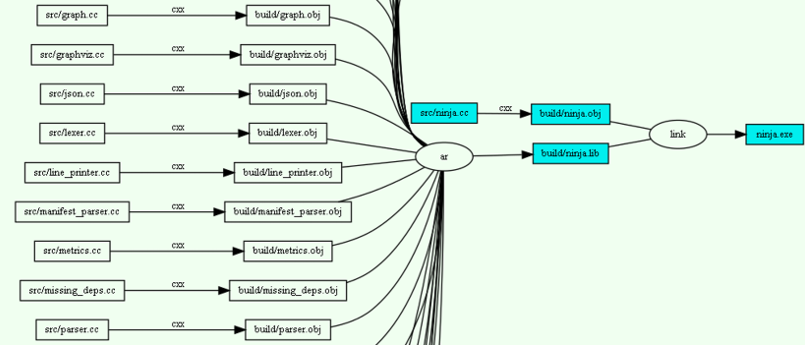
Ninja is build using Ninja with a technique known as bootstrapping. The bootstrapping step first builds an executable called ninja.bootstrap.exe and a build.ninja file. This bootstrapping executable is further used to build ninja.exe. The build is quite fast as the dependencies for Ninja itself are quite small. I generated the following graph of dependencies of Ninja using commands:
- ninja -t graph ninja.exe > graph_ninja.dot
- dot -Tpng graph_ninja.dot > graph_ninja.png
Working with Ninja
To get a software build using Ninja, we need to create the input build file which by default is named build.ninja. Let us see a section of the build.ninja created for building Ninja as an example:
# This file is used to build ninja itself.# It is generated by configure.py.ninja_required_version = 1.3# The arguments passed to configure.py, for rerunning it.configure_args =root = .builddir = buildcxx = clar = linkcflags = /showIncludes /nologo /Zi /W4 /WX /wd4530 /wd4100 /wd4706 /wd4244 $ /wd4512 /wd4800 /wd4702 /wd4819 /wd4127 /wd4355 /wd4091 /GR- /wd4267 $ /DNOMINMAX /D_CRT_SECURE_NO_WARNINGS /D_HAS_EXCEPTIONS=0 $ /DNINJA_PYTHON="python.exe" /FS /Ox /DNDEBUG /GL -I.ldflags = /DEBUG /libpath:$builddir /LTCG /OPT:REF /OPT:ICFrule cxx command = $cxx $cflags -c $in /Fo$out /Fd$builddir\$pdb description = CXX $out deps = msvcrule ar command = lib /nologo /ltcg /out:$out $in description = LIB $outrule link command = $cxx $in $libs /nologo /link $ldflags /out:$out description = LINK $out
Hand creating such a file is going to be a chore. Enter CMake, which has a backend generator specifically for Ninja!
Working with Ninja using CMake
Hand-creating input files for Ninja is difficult. A build generator system like CMake can be used to create the input files for Ninja. To showcase working with Ninja using CMake, let us build Ninja using CMake with Ninja as the backend.
Issue the following command from the directory where you have downloaded Ninja:
cmake -Bbuild-cmake -H. -GNinja
This should create a folder called build-cmake and you should find a file called build.ninja inside it. Here is the first section of build.ninja generated by CMake
# CMAKE generated file: DO NOT EDIT!# Generated by "Ninja" Generator, CMake Version 3.19# This file contains all the build statements describing the# compilation DAG.# =================================================# Write statements declared in CMakeLists.txt:## Which is the root file.# =================================================# =================================================# Project: ninja# Configurations: Debug# =================================================############################################## Minimal version of Ninja required by this fileninja_required_version = 1.5############################################## Set configuration variable for custom commands.CONFIGURATION = Debug# =================================================# Include auxiliary files.############################################## Include rules file.include CMakeFiles\rules.ninja
Make sure that ninja.exe created by the bootstrap version is in the path. Now issue the command:
- cd build-cmake && cmake –build .
This should build Ninja using Ninja with a CMake Ninja backend. Ninja runs build commands in parallel by default, based on the number of available CPUs on the system. Let us modify the cmake build command to let Ninja display the build statistics.
- cmake –build . — -d stats
Note: All parameters after — are passed to the underlying build system by CMake.
This prints us a nice build statistic:
Finished generating codemetric count avg (us) total (ms).ninja parse 2 1221.5 2.4canonicalize str 899 0.0 0.0canonicalize path 9473 0.0 0.4lookup node 1563 0.0 0.0.ninja_log load 1 51.0 0.1.ninja_deps load 1 32.0 0.0node stat 443 24.9 11.0StartEdge 72 62498.4 4499.9FinishCommand 69 2493.7 172.1CLParser::Parse 61 1157.5 70.6path->node hash load 0.72 (367 entries / 512 buckets)
I am reproducing an image from one of my previous blog posts that clearly shows how Ninja compares against Make on the compilation times of two open-source projects – bullet3 and LLVM.
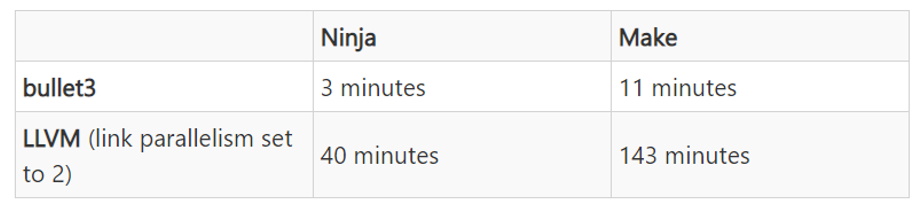
Here is another study that showcases how Ninja is better than Make in terms of compilation times.
Conclusion
In one of my previous blog, I had described Ninja as a small open-source build system with a focus on speed. In this blog post, we saw how small the entire Ninja source is (from the dependency diagram we created using ninja -t command), and how easy is it to set up and work with it. We also saw how CMake works great with Ninja as CMake has inbuilt generator support for Ninja. It is for these reasons that Visual Studio 2019 has the default generator as Ninja for WSL2 builds. If you want a clean and no-fuss build system for your project do consider a CMake and Ninja combo.