
Nothing threatens to slow the velocity of development more than the unexpected. In the case of teams that develop around Git branching strategies, unexpected or otherwise injected bugs can have a way of ruining the day. Using gated check ins, it is possible to catch faults like these before they make it to the release portions of the codebase. This process is meant to ensure code is tested against a known-good version as well as to coordinate the merging of multiple developers’ feature branches.
Gated check ins may also be used to help with additional workflows, such as those that require approval from other stakeholders like change management. Other gates allow for linking to work items to ensure a proper chain of audit is available. When set up properly, gated check ins can prevent a problem with broken builds before they spread to critical release branches.
Here, we will discuss gated check ins in a bit more detail as well as how they can help free up your workload by preventing problems from making it into code used for releases. We will also look at some examples of when to use and when not to use them. Finally, we will run through some of the available options as they apply to Azure DevOps gated check ins.
What Are Gated Check Ins?
Companies use Git and a Git branching strategy to support protecting their codebase and to open avenues for automated build, testing, and deployment. A downfall of this methodology is the possibility for problems to arise in an otherwise stable production application due to invalid code commits. Gated check ins extend Git usage by adding an automated layer of control to prevent the offending code from being merged into critical release branches.
This is important because of how new development is often branched off of currently released code with the intention of being merged back after the next release. For example, imagine our code exists in Git with a branch simply named RELEASE. Code is compiled and sent on its way to the various environments all the way to production. During the time our imaginary CI/CD process is taking place, developers are branching from the RELEASE branch so they can start on new features.
So far, this is a normal part of a development process. However, it is later found that logic contained in the released code is creating a new failure. Since all new features are based on the same unstable release, it is safe to assume the problem has been propagated through other developers’ code. By using gated check ins in conjunction with pull requests, teams can open more opportunities to catch this type of problem before it is able to have such an effect.
When Should Gated Check Ins Be Used?

Simply put, gated check ins should be used any time you wish to halt code merges from happening automatically within the system:
- To ensure CI/CD builds are successful before merging to critical code branches.
- To provide an opportunity for peer review via pull requests requiring a minimum number of reviewers.
- As a tool to correlate with linked work items.
In the case of Azure DevOps gated check ins, a common practice for safeguarding the codebase is to have gated check ins based off of a successful build. Meaning that as long as the build based off of the newly checked in code passes, it would be considered safe to merge. As expected, a failed build would be apparent, but only in the portion of the pipeline that is not meant for release.
Peer reviews are extremely important to many development teams. They allow collaboration for logical aspects of the code as well as best practice review. As part of the gated check-in process, a minimum number of reviewers can be set to required along with other adjustable flags depending on the team’s needs.
Having a proper chain of change management is becoming more and more important. Especially with additional regulation that sometimes crosses international borders. Part of this change management is requiring a method to track or audit those changes. Using the option to require a link to work items prior to merging is yet another way to ensure this data is being kept. It also supports agile methodology since stories can be associated with the actual code changed.
When Can Using Gated Check Ins Create Issues?
There are times when using gated check ins may cause issues. The foremost example of which would be a longer than normal queue time for builds. This is because gated check ins based on successful CI builds increase the number of overall jobs required. This is mostly true in situations where there are many developers working from the same branch.
Additionally, consider the testing aspect of a build. Rather than putting the ownership on the automated CI/CD process, developers can provide a first-line of defence by adopting a workflow that includes local testing. Freeing up the build servers in this way helps lessen the chances of jobs getting backed up.
Gated Check Ins in Action Using Azure DevOps
Azure DevOps supports many different methods of helping prevent invalid code from becoming a problem. The gated check in requirements available cover many of the ones discussed earlier. We will look at where these are set and some basic options to get started with Azure DevOps gated checkins.
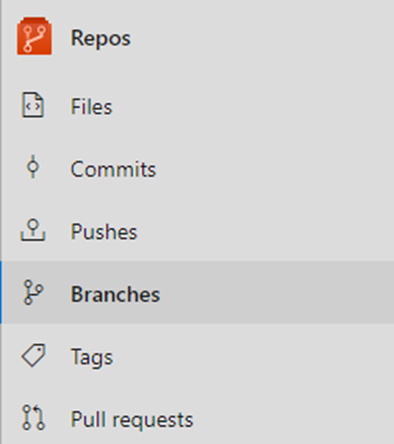
1. We need to decide which branch to protect. In Azure DevOps, browse to the Repos area and choose Branches from the left menu.
2. Open the context menu on the branch to protect and choose Branch policies.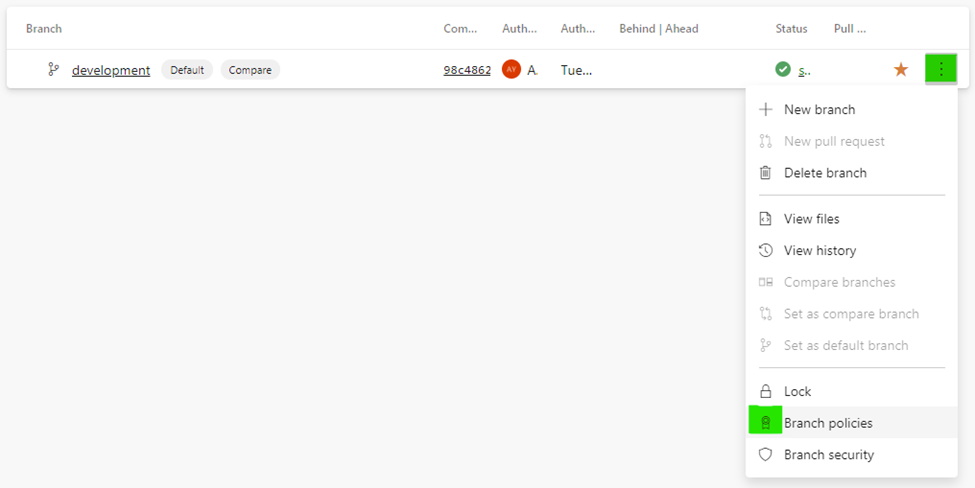
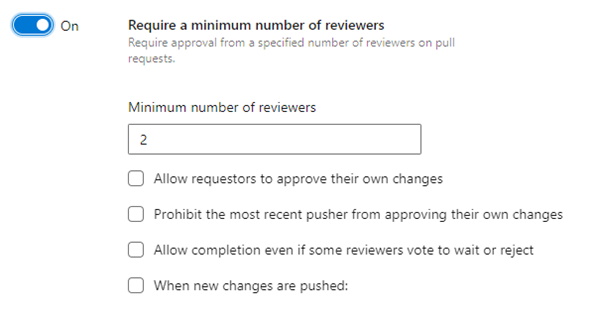
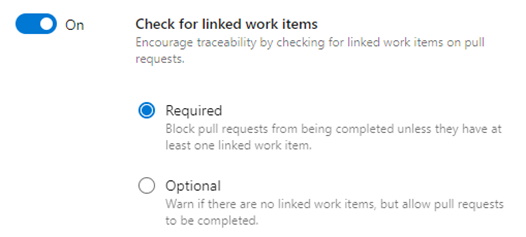
3. Here is where we are able to configure the items discussed, earlier:
a. Require a minimum number of reviewers — Some teams require at least 2 developers for peer review. This enforces a minimum number as well as preventing or allowing other activities.
b. Check for linked work items — This is important to show the trail of work items that are related to the code change. Teams can use this to ensure every change has a valid work item for justification.
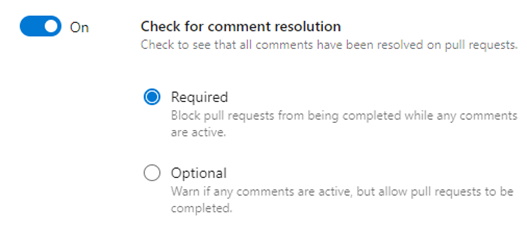
c. Check for comment resolution — During the pull request, comments can be put on the request that are required to be resolved prior to a merge.
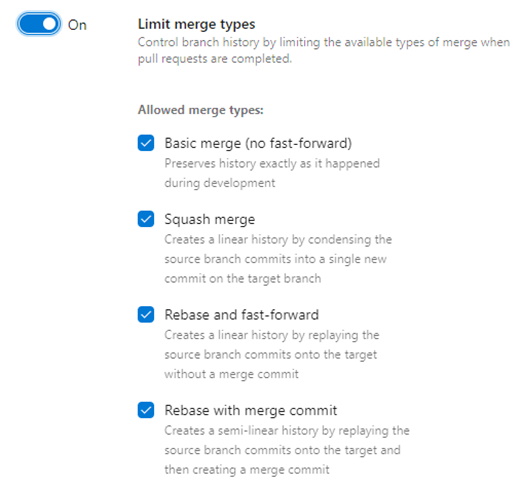
d. Limit merge types — This is used to prevent certain types of merges in Git. This is important for those that wish to retain a certain history of changes and is not commonly used by default.
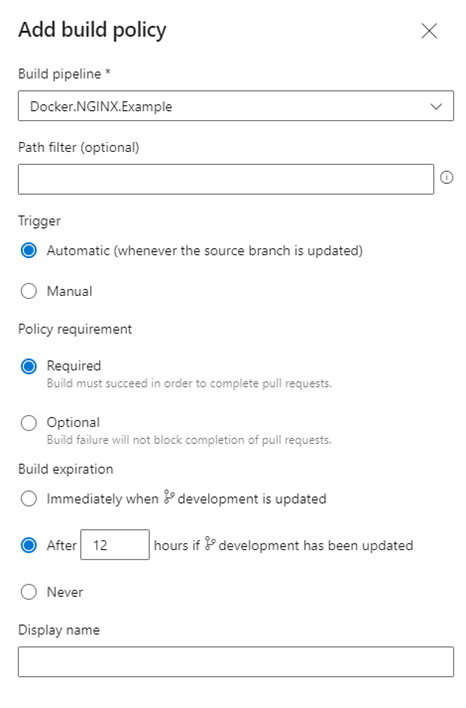
e. Build Validation — This item is especially important to ensure broken builds are recognized and prevent a merge from happening.
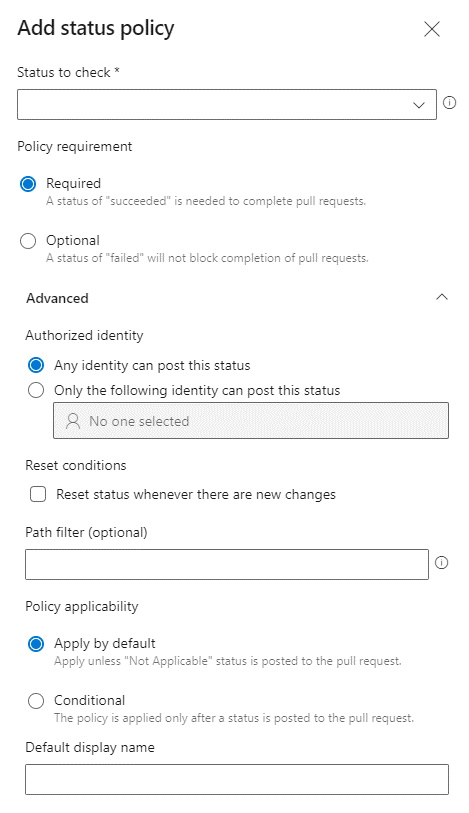
f. Status Checks — A less commonly used option, this uses the Status API to provide information like success/failure. You can read more about it here
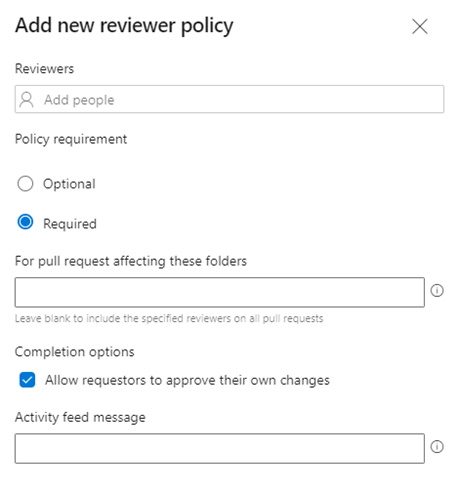
g. Automatically included reviewers — This is a way to add optional or required reviewers to the PR automatically. This also has the option to prevent the engineer requesting the pull request from approving their own changes.
- Related: All About Azure DevOps Build Process

Conclusion
By using one or a combination of these options, teams are able to complete a lot of activities using automation. Saving time and freeing up their workload using gated check ins. In the process, more assurance that clean code is merged to critical release branches and additional areas are added to provide quality checks. Extending your branching workflow by using gated check ins is a good way to help promote good development techniques in the team.