
In previous blogs, we’ve discussed the power of GitHub Actions to automatically trigger operations in your CI Pipeline. We’ve covered how you can gain extra flexibility using GitHub Runner on AWS spot instances, and how to use GitHub Actions with C++ projects.
This post will be a little more specific, focusing on how you can integrate GitHub Actions with Incredibuild (we’ve already discussed this in our community forum, but we’re expanding on the topic).
We’ll be covering two possible ways to trigger Incredibuild from GitHub Actions, achieving build distribution and acceleration as a result of a merged pull request, or any other trigger.
The idea is straightforward: adding Incredibuild’s build distribution into your CI pipeline to achieve build acceleration. Keep in mind that although we present below the specific details for GitHub Actions integration, it’s also suitable for other environments (e.g. Jenkins, GitLab CI, Bitbucket pipeline, Travis CI, TeamCity etc.) applying the same principles and ideas there with their equivalent steps and configurations. If you are already experienced with a specific CI pipeline, you may find that adding the acceleration provided by Incredibuild gives you more power and enhances your pipeline. We encourage you to try and enjoy it.
Prerequisites
We are going to present two possible architectures that differ on the way we host the runners. We‘ll discuss the pros and cons of each. For both scenarios you should have:
- Incredibuild Coordinator installed on your machine (if you do not have it, you may want to read our post on setting up the Incredibuild build system from scratch on AWS)
- A project synced with a GitHub repository
- Proper privileges for setting up GitHub Runner Actions
High-level architecture
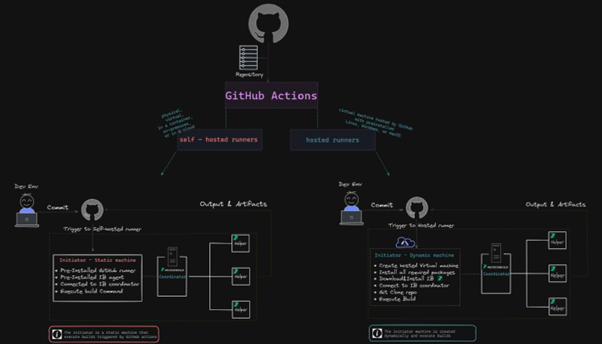
The high-level architecture is simple: a CI workflow is triggered from a push event to the project’s repository. GitHub Actions handles the event and triggers the build job on the Incredibuild-coordinator server, which distributes the build to Incredibuild agents (in our case, running on additional AWS nodes).
We are going to present running the action that is triggered by GitHub as a self-hosted runner or as a GitHub-hosted runner. The difference in our case is whether the initiator that starts the build is running inside the GitHub environment (the GitHub-hosted runner case) or on an external machine (self-hosted runner).
For a comparison between GitHub-hosted and self-hosted runners, you may want to follow this GitHub documentation page.
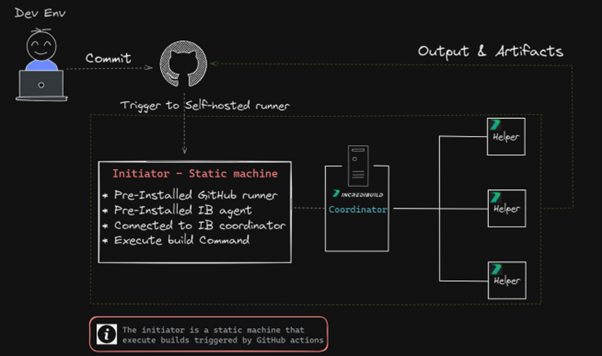
Self-hosted runners
Here is a more detailed view of the high-level architecture presented above:
Steps
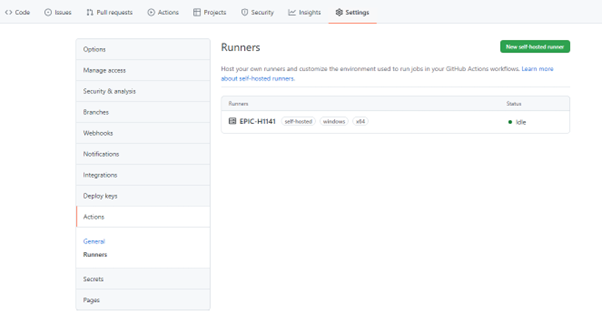
- Set up the GitHub runner (see: Adding self-hosted runners in GitHub Documentation):
- in GitHub Actions, go to Settings > Actions > Runners and click on “New self-hosted runner”
- Choose “Windows” (in our case) and follow the instructions.
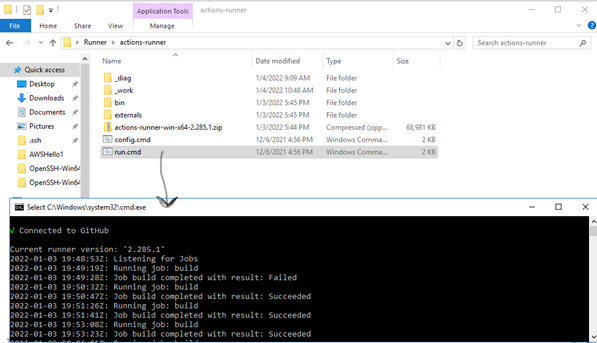
- On your machine open CMD and perform the following actions:
- For the download step, run the following commands:
mkdir actions-runner cd actions-runner Invoke-WebRequest -Uri https://github.com/actions/runner/releases/download/v2.285.1/ actions-runner-win-x64-2.285.1.zip -OutFile actions-runner-win-x64-2.285.1.zip Add-Type -AssemblyName System.IO.Compression.FileSystem ; [System.IO.Compression.ZipFile]::ExtractToDirectory("$PWD/actions-runner-win-x64-2.285.1.zip", "$PWD") - For the configure step, run config.cmd inside the folder you created in the previous step:
./config.cmd --url https://github.com/<your-repo-here> --token <your-repo-token-here> - Inside the same folder, run the ./run.cmd file:

The Runner should now listen for commands from GitHub Acftions, and you should see it as a Runner added to the list on GitHub Actions:

- For the download step, run the following commands:
- Create the Flow:
- In GitHub Actions, go to the Actions tab and click on “New Workflow”.
- From the list choose Manual Workflow > Configure

- Name your flow (e.g., build_flow.yml)
- Now, replace the content of the flow with the following YAML content:
# This flow will launch the instance where the Runner os listening and will execute the run command
name: IB trigger
# Controls when the workflow will run
on:
# Triggers the workflow on push or pull request events but only for the master branch
    push:
        branches: [ master ]
    pull_request:
        branches: [ master ]
jobs:
    # This workflow contains a single job called "build
    build:
    # The type of runner that the job will run on
    runs-on: self-hosted
        # Checks-out your repository under $GITHUB_WORKSPACE, so your job can access it
        - uses: actions/checkout@v2
        # Runs a single command using the runners shell
        - name: Run Rebuild batch file and distribute the tasks within IB helpers
        run: powershell <path_to_your_project_location>\ConsoleAppRebuild.bat
The path to your project location should match the one that you created in your config.cmd line

And, we’re done! Everything is now set to execute a build through Incredibuild once a pull request is confirmed. To follow the build progress with identical output as it appears on both the Incredibuild dashboard or in Visual Studio, go to the Actions > All workflows menu in GitHub.
A few notes on security and execution policy
In case you get the following error related to Execution Policy:
File <file_name> cannot be loaded because running scripts is disabled on this system.You need to set the execution policy as an Administrator by typing the following into your PowerShell window:
Set-ExecutionPolicy RemoteSignedYou can set the policy back to the default value with:
Set-ExecutionPolicy RestrictedFor more information and the security aspects, please read GitHub’s security documentation for self-hosted runners.
You can see how this process looks in real-time in the video below:
GitHub-hosted runners
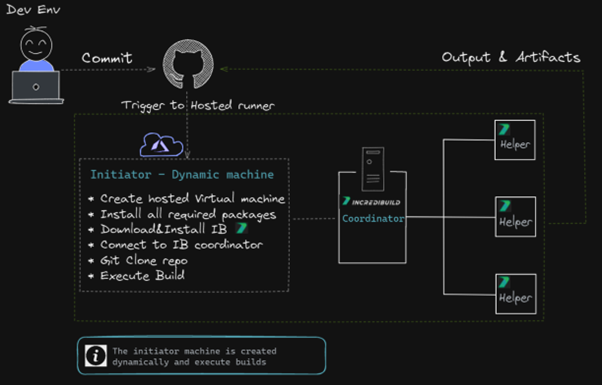
The high-level architecture turns now into this detailed sketch:
Steps
The steps to create a workflow in this case are the same as for creating a self-hosted workflow:
- In GitHub Actions, go to the Actions tab and click on “New Workflow“
- From the list, you can choose Manual Workflow > Configure
- Name your workflow (e.g., build_flow.yml)
- Now, replace the content of the flow with the following YAML content (here is where we see the first changes from the self-hosted example – we host the runner on GitHub, as you can see in the YAML):
name: Build on Windows
on: push
jobs:
  build:
    runs-on: windows-2019
    steps:
      -  run: |
          choco install wget -y
          cd C:\
          wget "https://<aws-node>.amazonaws.com/IBSetupConsole.exe" -O "C:\IBSetupConsole.exe"
          ./IBSetupConsole.exe /Install /Components=Agent /Coordinator=<ec2-address> /AddToPath=ON /Agent:InstallAddins=OFF
          New-Item -Path 'HKLM:\SOFTWARE\WOW6432Node\Xoreax\IncrediBuild\Log'
          New-ItemProperty -Path 'HKLM:\SOFTWARE\WOW6432Node\Xoreax\IncrediBuild\Log' -Name 'Level' -Value "4" -PropertyType String -Force

      - name: Add msbuild to PATH
        uses: microsoft/[email protected]

      - name: Clone Repository and Rebuild with Incredibuild
        run: |
            cd C:\
            git clone <GitHub project>.git
            cd C:\TestBAC-100-
            $env:Path = '<IB Path>\IncrediBuild'
            BuildConsole.exe '<project>.sln' /rebuild /cfg="Debug|x64" /usemsbuild

      - name: Upload artifacts
        if: always()
        uses: actions/upload-artifact@v2
        with:
           name: my-artifact
           path: |
             <IB Path>\IncrediBuild\History
             <IB Path>\IncrediBuild\Logs
Of course, you need to replace all <IB Path>, <GitHub project> etc. with your proper values.
This YAML is configured specifically for running Incredibuild on a GitHub-hosted runner. But to better understand the YAML you may want to have a quick walkthrough at GitHub-hosted runners documentation. The main idea is that the script would run on a GitHub-hosted machine!
As you may have noticed, the difference between the self-hosted and GitHub-hosted is in the runs-on parameter, which was “self-runner” for the self-hosted case and “windows-2019” for the GitHub-hosted case.
How does this example work?
- GitHub Action will create a new VM with windows-2019 (line #5)
- Then will install all relevant packages for our project, from Choco (line #8)
- Download Incredibuild installer from S3 public bucket that we prepared in advance (lines #10-11)
- Run IB silent installation and connect to your organization coordinator (line #11)
- Optional: Increase the Log level to detailed (lines #12-13)
- Add msbuild to Environment Variables (lines #15-16)
- Create and clone our code (lines #20-21)
- Add BuildConsole.exe to Environment Variables (line #23)
- Run our Buildconsole command (line #24)
- Optional: Upload all required artifacts, Logs, Build Monitor, Executables etc. (lines #26-33)
You can see it clearly in the video below:
GitHub-hosted runners challenges and limitations
Currently, GitHub-hosted runners and hardware resources are quite limited and don’t suit large projects. For a list of GitHub-hosted options see: GitHub-hosted runners – Supported runners and hardware resources.
All required packages need to be installed each time on the newly created runner, which takes time.
The connectivity between initiators and Coordinator is poor which might cause “Task impeded“ and increase compilation time.
To summarize
Integrating the Incredibuild system with GitHub Actions is not too complicated. You can achieve that with different deployment options, all at the end converge into a simple trigger that operates your build distribution seamlessly, via Incredibuild. By adding IB build distribution into your CI pipeline you get seamless build distribution and acceleration, with the proper triggers from GitHub Actions.