
Our team has talked a lot about the amazing tools available in Unreal Engine, including the newest early access of Unreal Engine 5. Thanks to Epic, game development has never been more accessible to devs and teams around the world. Possibly the biggest impact Epic has had on the film and game world is the power of Unreal Engine rendering.
Much like every other aspect of game development, it can be easy to start, but take years to master. My hope is to help with that path and give you some of the tips and tricks I’ve learned over the years working with Unreal Engine and talk about some of the big game changers when it comes to rendering.
The Camera Is Key
One of the easiest ways to make fantastic-looking renders is the use of Quixel bridge assets. If you don’t use Quixel for cinematic renders or materials, definitely give it a look to help boost the graphic quality in any project.
The other difference is the camera.
Through some basic tweaking of the in-engine camera specs within Unreal you can find a level of photorealism by mimicking actual specifications of cameras in the real world. People are used to the way scenes look in films or when recorded with a camera. The normal eye wouldn’t necessarily blur the foreground the way this image does, but a Hollywood movie might.
A basic rule of thumb for Unreal Engine rendering is this:
For small objects, try raising the aperture. This will blur out the background and foreground quite a bit, adding to what’s referred to as the tilt shift effect. Even a large truck can look small if used like this.
The Rule of Thirds
Along those same lines, a classic rule in film is The Rule of Thirds. Though really just a rule of thumb, this concept is a big help when trying to create more natural shots.
Divide your shot into a grid consisting of two horizontal and vertical lines. When you place components of your image along the intersecting points of this grid, it creates a scene that’s much more pleasing to the eye. When we frame a scene, we are telling people where to look. That’s not the way we work in reality. Our eyes gravitate toward certain things because they’re interesting, because they’re framed the way we want them to.
The rule of thirds allows us to place much more detail in a shot, while still giving the viewer the freedom to explore the shot. It’s extremely easy to center a character or prop in a shot, but there’s something about those intersecting points that tickle our brains in just the right way.
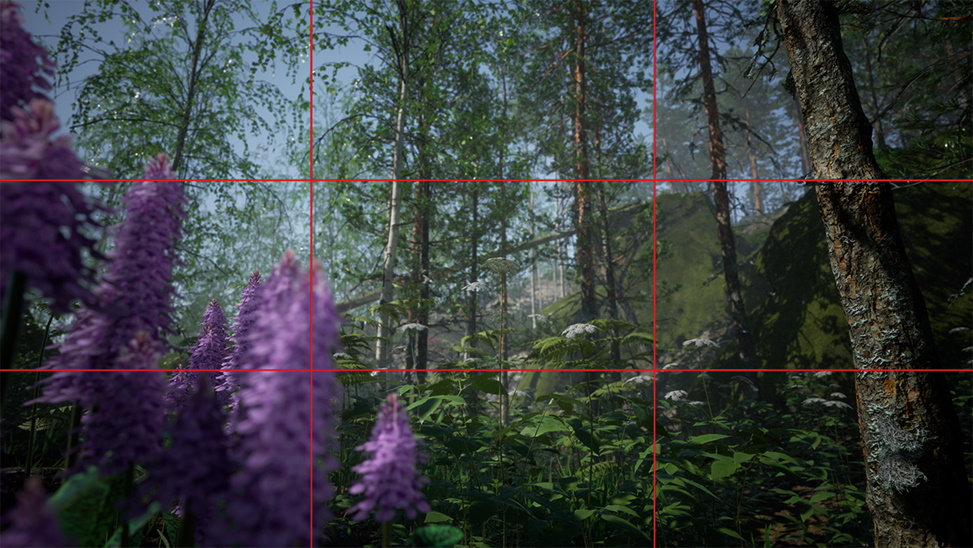
Here, the rule of thirds helps frame foreground elements. In addition to its placement, the contrast of the lavender to the rest of the forest is made that much more noticeable, adding to the depth of the scene and the perceived detail of the forest.
Lighting Techniques
Ambient Occlusion
Ambient Occlusion, often referred to as SSAO or Screen Space Ambient Occlusion, creates a more realistic lighting effect by calculating the effects of occlusion on materials. In a considerably basic sense, this means instead of a blanket global lighting, corners and objects will be shaded much more naturally. A great starting point isan AO setting of 1 with a radius of 200.
As with any scene, changing these settings can greatly enhance the mood you’re trying to accomplish, and is different for everyone based on room size, theme, etc.
Ambient Cubemaps
A way to provide further realism to your scene is by providing the engine with an Ambient Cubemap. Many packs on the marketplace provide cubemaps to use in your scenes. A cubemap is a texture providing a lighting texture from a real-world or generated scene. It’s a great way to set more natural lighting in desert scenes, small rooms, and any environment you may be working with.
Color Grading
One of the most powerful tools available in the realm of Unreal Engine rendering is the Post Process volume is the ability to add a Color Grading texture to your scene. Color grading is used throughout cinematic films and games. It’s a very quick and easy way to adjust the color balance and saturation of your scene, without tweaking lighting and materials one by one.
This is also one of the greatest ways to create a thematic impression on your viewers. By using a color grading texture with an emphasis on blues, for example, you can boost your ocean scenes or the majesty of a fantastic heaven in the sky. There are a lot of great color grading textures available on the Unreal Marketplace as well as around the internet. I highly suggest using color grading, even if in small amounts to add a bit of emotion to your scenes.
Unreal Engine Rendering – Don’t Forget the Basics

There are some essential components in Unreal Engine rendering that can be a big help when used in moderation. Things like lens flares, field blur, and vignettes can really add to the cinematic feel of a render. They shouldn’t be overused, however. Relying too heavily on these components is obvious to the viewer and will become your fingerprint for renders.
Think of directors like Wes Anderson, with a very obvious style of cinematography. It can be a great thing to have easily recognizable cinematography, but it can also be a curse.
In this same vein, don’t forget the basics of Unreal Engine renders. Always bake out your lighting, get different angles for safety. Filming in the new era is different than it was fifty years ago, but that doesn’t mean we should forget, as artists and creators, what brings people to enjoy the digital platform.
Player Accessibility vs. Realism
If you’re rendering out a short film, this isn’t a big question in your head. However, as a game developer, a common question is whether you want your game to look real or if you want more people to play it. Creating a game that’s accessible for more players is important to ensure a growing fanbase.
Of course, players also expect a great-looking game thanks to the content created by Unreal with games like Gears 5.
If you’re building your game using Unreal Engine 5, this isn’t a big concern. There are great new texture streaming and polygon tools in Unreal, but if you’re still using the official releases such as 4.26, there are a few things you can do to provide great quality while still allowing for players on lower-end machines.
Large Scenes, LODs and Culling
Light Importance Volumes allow for more detailed lighting and shadows within a certain portion of your level. The biggest benefit to this is for more linear-style games like Call of Duty. Within your player’s main level, the lighting can be highly detailed, while the background still looks great from a distance.
Along those same lines, LODs, or Level of Detail, should always be set up for your meshes. Essentially LODs allow the engine to bring more detail to closer meshes while further objects lose some detail the further you move.
In large levels, even with level streaming enabled and optimized, large amounts of foliage can greatly impact performance for games and film. Foliage Culling allows putting a minimum and maximum view distance for instanced foliage. Basically, if it’s too far away, it’s just gone, and brought back into the scene when closer to view.
Ray Traced Reflections
Ray Tracing has been a part of the conversation in 3D renders for a long time. There’s no denying the power Ray Tracing can provide to developers and filmmakers in the digital age. In the past, it was something that took a lot of computing power. Many developers have waited hours to render scenes using Ray Tracing, and luckily Unreal Engine can help.
If you don’t know what Ray Tracing is, put simply, it’s a way to calculate reflections and refractions of light rays on different materials. Obviously, this can take a heavy toll on performance when we enable this.
That’s where real-time screen space Ray Tracing comes in handy. As opposed to calculating the entire scene, you can set the Ray Tracing component to only calculate what your camera can see. While still taking a hit to performance, if you’re rendering a film, Ray Tracing should always be a part of the equation. If you’re on a lower-end machine with a tight deadline, I definitely recommend using screen space reflections.
Scenes, where this is most necessary, are any that include wet materials, glass, and reflections. However, it does help a lot when dealing with more natural shadows. As an example, shadows tend to lighten and blur as they reach their end farther away from the object occluding the light. Without Ray Tracing or AO enabled, rendering engines tend to show one very simple shadow. With these tools running, we get shading that is much more natural and what our viewers expect from a real scene.
Dynamic Resolution
If you’re focusing on great graphics for a game, Dynamic Resolution is your friend, and Unreal Engine is the tool for you without a doubt.
Dynamic Resolution allows for real-time tweaking of the graphics quality in order to maintain a consistent framerate for your players. The Engine calculates this by using the previous frames’ rate and power used to allow for that FPS.
Without this enabled, the game will simply follow along with the pre-set graphic quality and players on low to mid-ranged machines will experience much more lag.
“I’ll Fix It in Post.”
For film or trailers, don’t underestimate your ability to edit footage after recording. Just like in film of the past, you’d be surprised how often Unreal Engine artists still say “I’ll fix it in post.”
Of course, you want to get as close to the final look you want while recording. You can only fix or composite so much after the fact. On lower-end machines or with time constraints, however, it may be more beneficial to use matte paintings in a program like after effects and one of the easiest ways to accomplish compositing with Unreal Engine rendering is by exporting to a series of exr files rather than an AVI. This allows you to use the Alpha channel available in the footage, as opposed to using a blue or green screen material.
Let’s Recap
In closing, Unreal Engine rendering is insanely powerful. It may take time to find your perfect workflow and that’s part of the learning process. Hopefully, some of what we’ve talked about today can help you in your journey to better renders.
The big hope for these lessons is not only better renders, but faster ones. Scenes that used to take hours and hours of tweaking are something you can hopefully put together in an hour or two thanks to the basics and workflows outlined here today. Speaking on faster, if you haven’t yet tried Incredibuild for Unreal Engine, you should definitely give it a shot for an accelerated experience of Unreal Engine.
These tips might help you with better renders, but everyone is different. If you find tricks that help you, share them with the community, let’s all help each other to create better content!